
Title: Magical Renegades Anathema to Commonsense
Final launch date: 20 Apr 2020
Genres: Magical Girl, Comedy, Action, Drama. Fantasy with sci-fi elements.
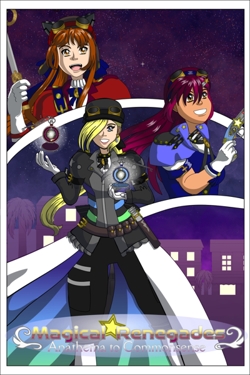
This is my main project, a magical girl webtoon several years in the making from a lot of trial and error and through rebooting. How fitting for a story with a time travel plot that centers around an incident that put the space-time continuum at stake, but sunk costs after rebooting are painful! The production process is smooth now after that trial and error that I can confidently say that the launch date which is for the webtoon reboot is the final version!
Anathema to Commonsense is the main story. As I developed it, I had a lot of extra ideas to write down which led to spin-off stories and the creation of these sites:
 |

|
Magical Renegades Record Compendium (Wordpress) |
|

|
Magical Renegades 90's R e s o r t (Neocities) |
Visit them for supplementary material! WIPs, trivia, extra stories and drawings. Visit 90's Resort to view them in a 90's Web-inspired experience!
I was inspired by the magical girl genre, moreso the Magical Girl Warrior sub-genre, and wanted to make a comic and wanted to incorporate a lot of things that I thought were cool like steampunk fashion and technology! Unfortunately I didn't have experience writing any long stories, nor much of a plan and I'm no master at improv! I also dreaded drawing interior backgrounds before I developed an interest in historical architecture! ^^; After a while I became dissatisfied.
As I continued, I added on details since much of the worldbuilding and lore were lacking when I started, but some retcons I wanted to make were drastic. The retcons were an overall improvement and added a lot to the characters, lore and story, but trying to add them in the middle of the story was just too messy. I wrote myself into a corner that I was better off planning out a lot more of the foundation and starting over with it!
The previous version which was a comic lasted around 170 pages. It was supposed to be the final version, but I discontinued it in 2019 because the pacing became too slow for me to stay interested! It was too slow in that way, but the story was fast-paced in all the wrong ways too; there was nearly constant movement from one plot point to the next without focusing on the characters very much so they didn't have as much depth as I intended.
I intended to reveal a lot about characters' backstories later on, but that just wasn't going to work with the pacing of the story. Pacing can make or break a story!
If I could go back in time: I'd bring the compendium of notes and lore that I have now and tell my younger self to read through it before starting to avoid these issues!This is the main program that's used for the webtoon episodes and some illustrations. The lineart, base coloring, shading, gradients, text, speech bubbles, panels and some backgrounds are all made with it! Nearly everything is except for the finishing touches or anything else that'd be too tedious to do with vectors.
Vectors are great at producing crisp lineart, and I chose them for the ease of making that cel-shaded anime look! They can also be very useful since they can be scaled to any size without any loss in quality. Backgrounds and props can be scaled as needed.
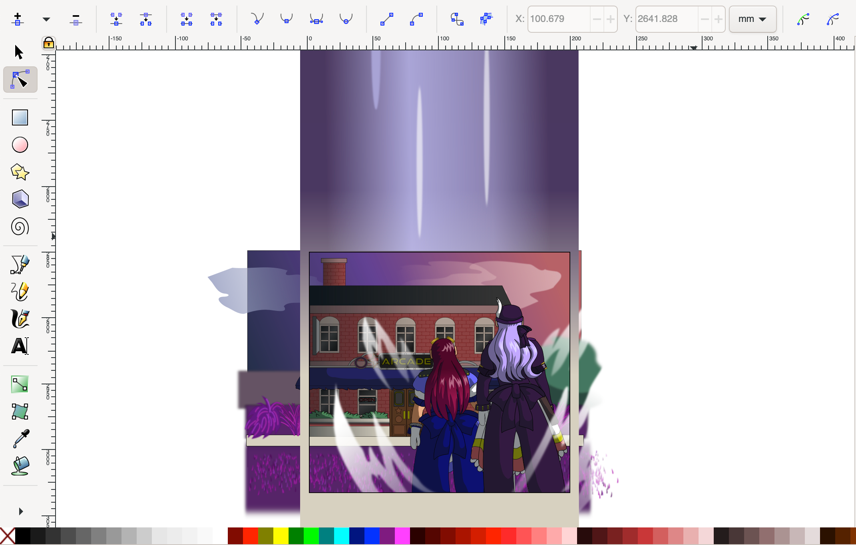
From episode 24. All that's missing are the finishing touches such as the effects to color the lighting.
Raster and vector graphics have their own strengths and limitations, and I use both of them to complement each other. I chose Krita for some illustrations, and is used for the finishing touches of each episode:
I've only used the default selection of brushes that come with Krita, but it's a nice selection that can achieve a lot of effects!
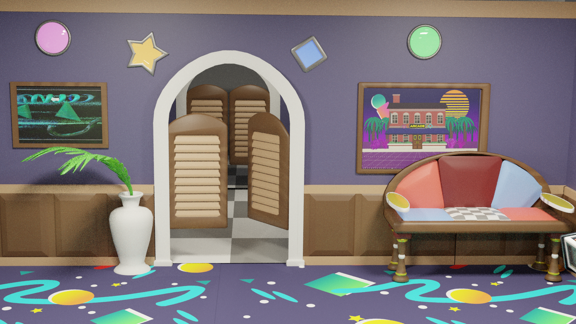
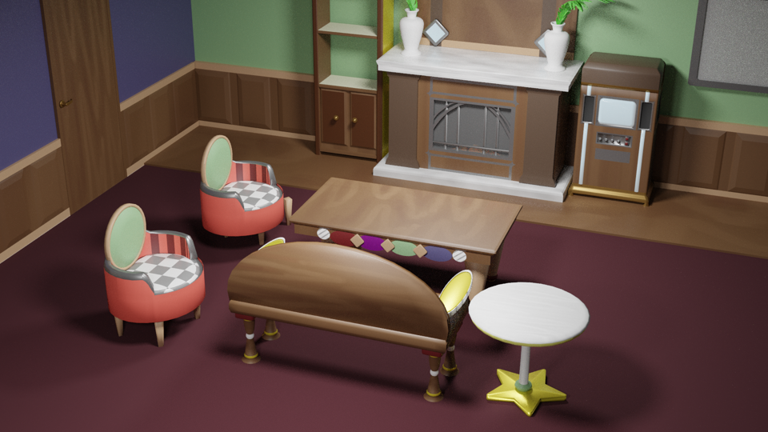
This isn't the first 3D modeling program that's been used in Magical Renegades, but it's the one that's practical for designing architecture! Episode 7.5 was the first to make use of a background with this program.
Starting with episode 25, I moved towards modeling interior backgrounds in Blender again. This slowed down the production process a lot when I started, but I've become more efficient with practice. Since I moved to using Blender to model backgrounds again, I started consistently writing WIP posts in between episodes. You can read the WIPs, which also cover the the processes I use to model backgrounds and how I've blended them in The Production Room page on 90's Resort. There's a lot I learned while I modeled backgrounds for these episodes!
This was the first 3D modeling program that's been used in Magical Renegades!
If these backgrounds look like they were rendered in a program from the 90's, that's because they were! They deliberately aren't blended in to stand out more, give scenes an otherworldly feel, and because it's cool! At the time I made the episode those backgrounds are for, I was also more proficient in Infini-D than I was in Blender. ^^;
I'm nostalgic for Infini-D, but it was such a long time since I used it. The interface is pretty easy to navigate and I learned a lot just from trying things out without a manual.
This program still works well for backgrounds in time rifts and some other otherworldly places. I could make these retro and otherworldly backgrounds with Blender now, but I might still want to use Infini-D again when I want that 90's CGI look!
I used this program alongside Infini-D for some of the backgrounds. Several of the materials that were put on objects were imported from Brushstrokes.
I plan out essential worldbuilding, lore and character details. These are used to provide direction when writing the script. I don't plan everything out before I start writing the scripts since I like to have some flexibility, and sometimes ideas just happen while I'm writing, but having the essential details before I started writing the script is... essential. These included:
The basic rules for time travel: Changing the past can change the future, and changing the past has unintended consequences since a time traveler may not be able to control every single variable that could cause history to change. The most extreme impact can include damage to the space-time continuum itself! All time travelers undergo strict training and have to enroll in The Academy for Time Travel, and the Academy's official stance is to primarily use time travel for research purposes.
Basic details about the setting: Geography, major historical events, underlying societal issues that led to the major historical events. The main country where the events take place is an island and one of is major historical events was in 1884 when the demon faction, The Minions of Nemesis, attempted to overthrow the royal family. The country was an absolute monarchy under years of civil unrest; many of the monarchs in this dynasty were tyrants, and the monarchs who were reigning then weren't assumed to be any better than their predecessors. The attempted overthrow, whether it was successful (1st timeline) or thwarted (2nd and 3rd timelines), led to a power struggle that erupted 3 years later and drives the main plot forward.
Was this overthrow, or thwarting it just going to be trading one evil for another? The people hoped this dynasty would be replaced with anyone or anything better, but the successful overthrow that happened in the first timeline was by a group with their own self-serving motives. The Minions of Nemesis ran the country to the ground and they too were overthrown by the resistance in a few years.
Many years later, one of the protagonists read of these events. She was a student at the Academy for Time Travel. Inspired by the resistance leader, and disagreeing with the Academy's official stance, the student set out to meet this resistance leader (who is another of the protagonists) when she was still human and team up with her to stop the Minions of Nemesis' takeover before it was going to happen!
The existence of different character classes and their relation to each other: These include humans, mages, ghosts, demons, witches, warlocks, time travelers and magical beings who can manipulate the metaphysical realm and see beyond the fourth wall!
Details about the styles of magic: Humans don't have the ability to cast spells on their own. They can create or use potions, and could use anti-magic weapons or become initiated as a mage. The two paths are the classical mage and nova-class mage paths. The classical mage paths have been around since ancient times, have strict rules governed by the magical bureaucracy ("The Magestablishment") and have more political power. They are a major force in shaping the Magestablishment to what it is.
The nova-class mages were pioneered by the Magical Renegades faction (see the next notes about factions), and they use magical weaponry that allows wielders, even humans without any magic ability of their own, to bypass the Magestablishment's rules to become mages. These weapons allow their wielders to cast spells more quickly, but they're still mostly untested so there may be hidden risks with using them.
Details about the styles of magic: How each of their magic styles work, their advantages and disadvantages. Some styles are specific to character classes such as ghosts, demons and time travelers. There are different styles or ways to cast magic within the classical and nova-class mage categories. These two magic categories aren't specific to any one class. I wrote them to have balances since there's a magical bureaucracy that exists to uphold a balance of power.
I also adhere to the idea that power always comes at a price so everyone who gained magical power did at some cost, or there was some risk. No one got theirs just handed to them without any risk! The classical mages have to be initiated and follow the strict rules of the Magestablishment. The nova-class mages can only use their weapons and transform into their magical alter-egos if their transformation device works properly; malfunctions can leave a nova-class mage unable to fight!
Character designs and notes: Notes about characters' personalities, interests, backstories, and which faction they'd join.
The relations that the classes and factions have to each other: These help guide the events that happened across and between timelines, and the rules that characters in certain factions have to follow. These in turn shape character interactions.
The Magical Renegades were seen as the enemies to the Magestablishment, and accused of being threats to the balance of power. The royal family's military tried to crack down against the Magical Renegades in its early years; there were several fights. It took until 1884 in the second and third timelines for many of the classical mages to change their minds since the Magical Renegades thwarted the overthrow, and diplomacy could begin.
Most of the production process is made with Inkscape. At the start of production of an episode, I create the background of the episode and add a narrow rectangle objects along the left and right edges. This will be a reference for the margins for panels that don't take the entire width of the background. The narrower panels are (usually) rectangular objects that are placed and scaled within the margins. The Difference Boolean operation tool cuts out the panel objects from the background so the drawings and backgrounds for each panel can be placed below it.
After this step, the panel cutouts can still easily be moved or adjusted by selecting their vertices and moving them. Placing the text and speech balloons during this step helps guide where I should cut out the panels. Since the body of the episode is a vector, it's easy to move and adjust them.
Some episodes are adaptations of comic pages from the previous version and port panels from it. Since vectors produce nearly everything in those pages, this is pretty easy. The art can be touched up on each panel by simply adjusting paths. When anything needs to be resized, it can be resized without any loss in clarity. If a character or any items were redesigned? No problem! Removing, adding or replacing details are easy changes!
Those episodes aren't 1:1 adaptations of the pages. Dialogue may be changed. Panels may be left out, re-arranged, or new panels could be added between them to improve the pacing. Let's look at episode 2 as an example; Renegade Liberty introducing Susana to the Renegades and showing off part of the initiation process was an addition in the webtoon. Previously this happened off-screen, but this was important to show!
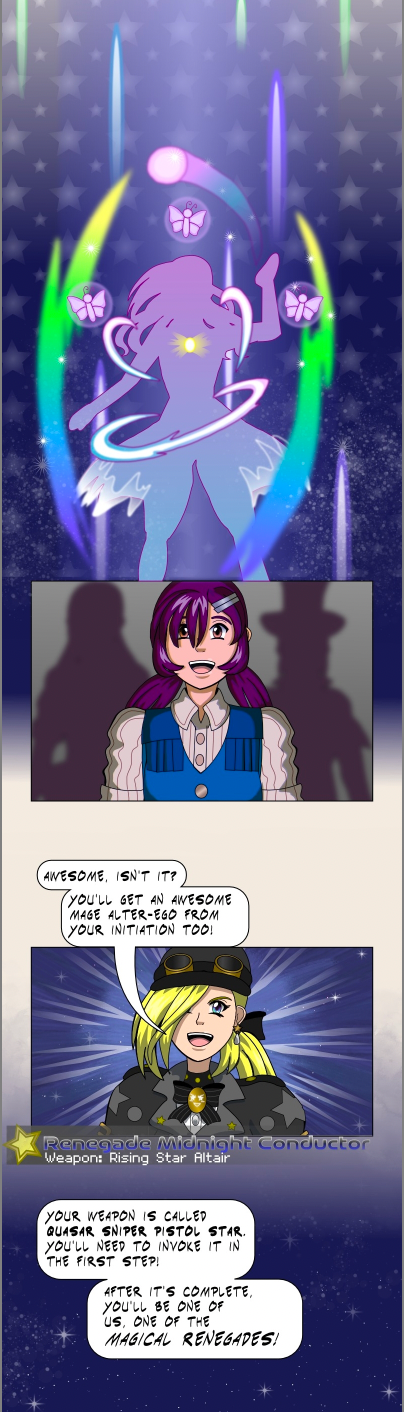
Previously, this was off-screen! Leaving this out was a missed opportunity to show how the initiation process worked in one of the first episodes!
After planning out the essentials, there are still many lore, worldbuidling and character details that slipped my mind at the start, and I wrote them in later. Art challenges that use prompts have been very helpful filling out more details since the prompts are usually ideas I didn't consider drawing or writing about before. Character writing exercises are also very helpful!
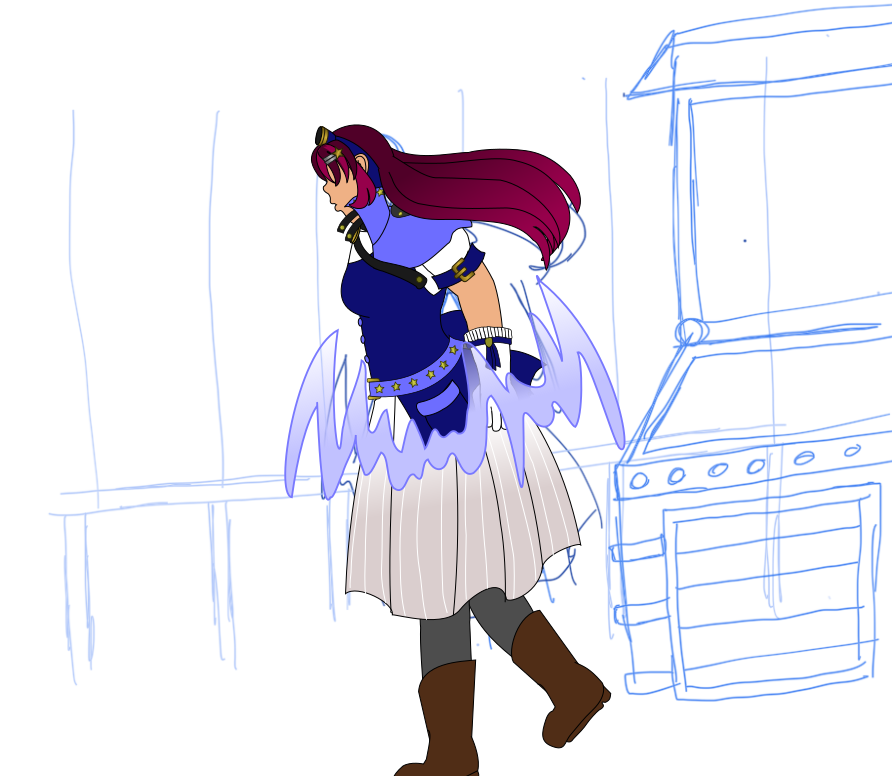
New panels are sketched, and then imported into Inkscape to be vectored. Vectoring is tracing over the sketch by adding the stroke (lineart) and base color (fill), and adjusting details as needed. The sketches can be rough since the refining is done in this step.
A WIP from episode 25 that shows the step of vectoring over a sketch.
When new rooms needed to be modeled for the backgrounds of an episode, I model them in Blender after writing the script, but usually before I vector the sketches for the panels. This is a long step and I'd rather complete it before I move on to the next ones. When the rooms are modeled and ready to use, I'll adjust the camera and lighting to render the backgrounds. I made two renders of some of the backgrounds; one in Cycles engine and one in Eevee engine, but more often I've just been rendering with Cycles.
After the 3D backgrounds are rendered, I import them into the episode to scale them down to fit the panels. This'll save a lot of time with the next step because the rendered backgrounds are always wider than the panels even when scaled down to the height of the panel. The background width can be trimmed by clipping the background to the size of the panel.
Next I import the resized background into Krita to draw in the line art and paint over the shading to give them a look closer to cel-shading. When there are two renders, they're blended together into an intermediate that has more ray-tracing details than the Eevee render, but not as much as the Cycles render. A bit of noise remains in the Cycles renders, so there's an extra step to removing the remaining noise. These steps blends them in better with the art style.
These steps to blend the backgrounds are because I didn't know how to do cel shading in Blender or how to control the settings of Freestyle to add lineart to a render in the ways I consistently wanted. Since writing this, I started to learn these steps and may move towards them at a later time.
The finished backgrounds are imported back into the panels in Inkscape. They're added in this step since the lighting of the backgrounds determines which colors and angle to use for shading the characters and objects. Shading them is the next step, then manually adjusting the width of the line art in several places throughout the episode.
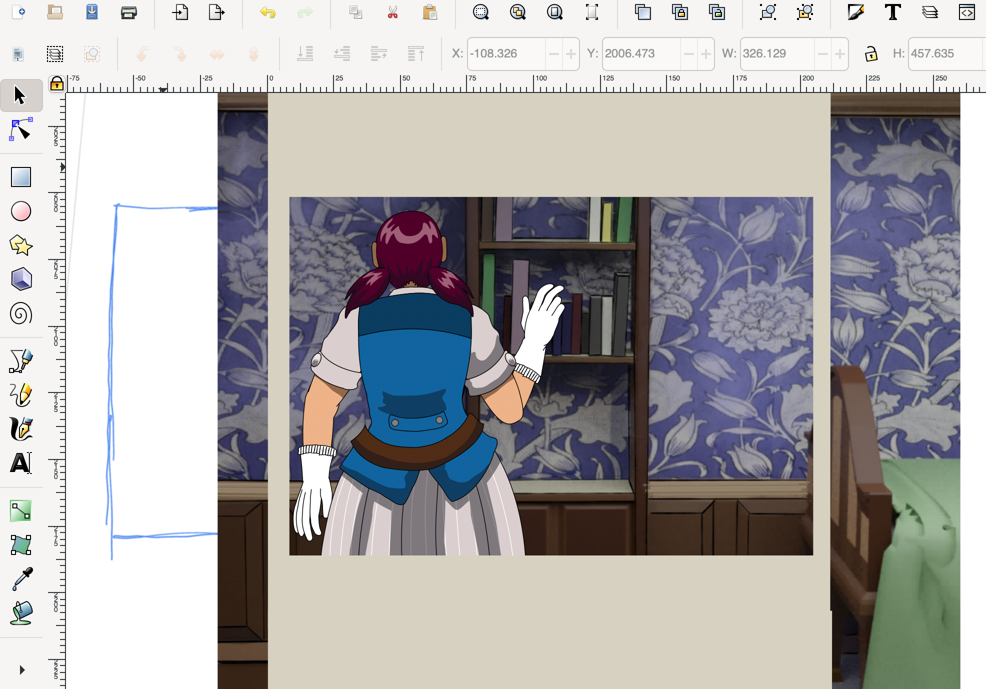
A WIP from episode 26 that shows this step.
After the backgrounds, shading and everything else, one more step before exporting! Varying widths to the lineart are added by duplicating several objects and converting their strokes to paths that can be adjusted.
The episode is exported in parts as .PNG files that'll be put together in a new file in Krita. The finishing touches are added here to complete the episode!